Keeping your pool’s alkalinity in check is critical for clear, safe, and comfortable water. Here’s the quick version:
- Alkalinity Range: Aim for 80–120 ppm. Lower than 80 ppm can cause corrosion and irritation, while higher than 120 ppm leads to scaling and cloudy water.
- Testing Frequency: Test weekly or more often during heavy use or after rain.
- Adjustments:
- Low Alkalinity: Add sodium bicarbonate (baking soda). Use 1.4–1.5 pounds per 10,000 gallons to increase by 10 ppm.
- High Alkalinity: Use muriatic acid or sodium bisulfate. Dilute and add carefully to avoid damage.
- Safety: Always wear gloves, goggles, and protective clothing when handling chemicals.
Balance alkalinity first before adjusting pH levels. Professional pool maintenance prevents equipment damage, keeps water clear, and ensures a pleasant swimming experience.
A Beginner’s Guide to Total Alkalinity in Your Pool
sbb-itb-a36f8f1
What Is Pool Alkalinity?
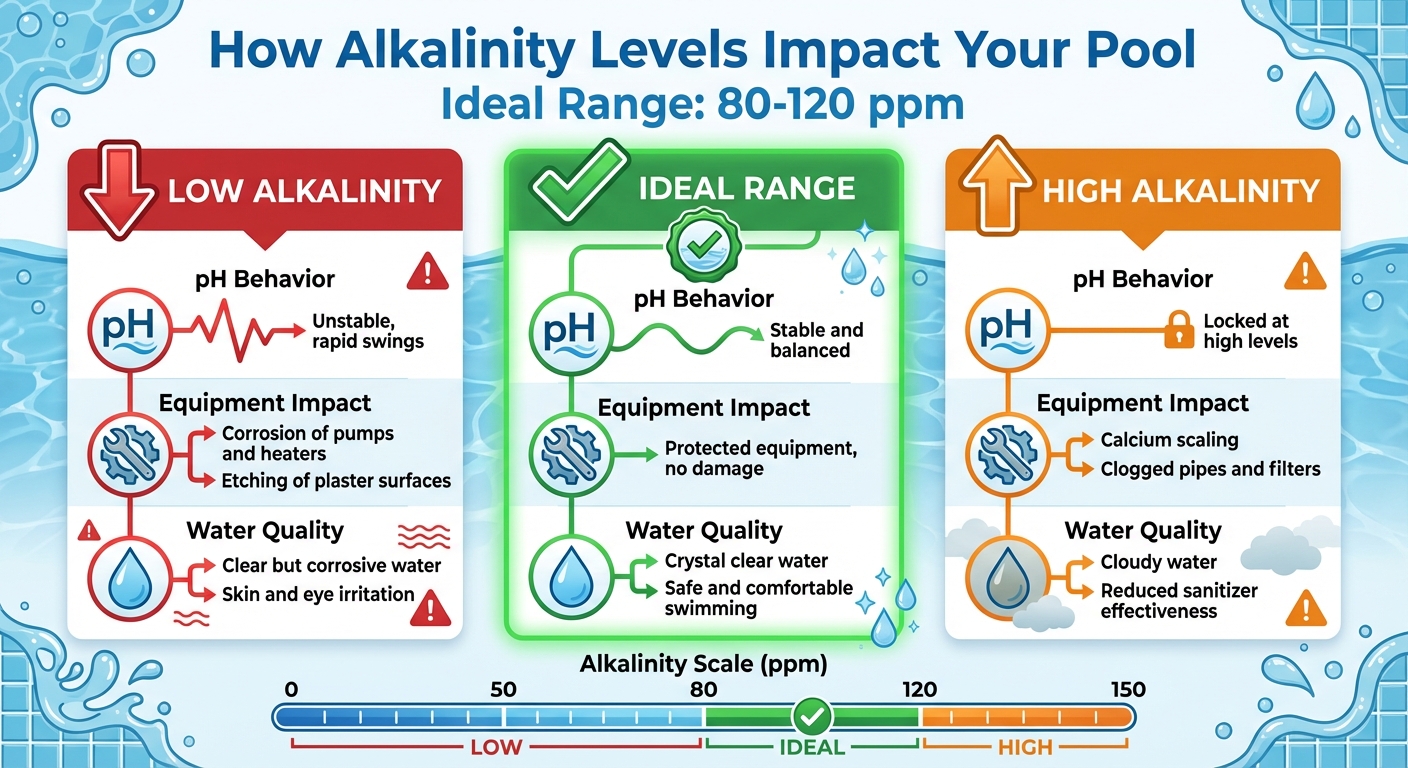
Pool Alkalinity Levels Impact Chart: Low vs High Effects
Pool alkalinity refers to the water’s ability to resist changes in pH, which is determined by the concentration of bicarbonates, carbonates, hydroxides, and cyanurate ions. Essentially, it measures the pool’s pH-buffering capacity, helping maintain stability.
The ideal total alkalinity range falls between 80 and 120 ppm. If your pool uses sanitizers that tend to increase pH, like salt chlorine generators or liquid chlorine, aim for 80–100 ppm. On the other hand, if you rely on acidic sanitizers such as trichlor or dichlor, shoot for 100–120 ppm. Always address alkalinity levels before adjusting pH, as correcting alkalinity often naturally helps bring pH into balance.
How Alkalinity Stabilizes pH
Think of alkalinity as a buffer or cushion for your pool’s pH. It absorbs the impact of acids introduced by chemicals, swimmers, or environmental factors, preventing sudden and extreme pH fluctuations. This buffering action keeps your pool water more stable and predictable.
Problems Caused by Incorrect Alkalinity
When alkalinity strays from the recommended range, it can cause significant issues for your pool and its components.
- Low alkalinity (below 80 ppm): This can corrode metal parts in your pumps and heaters, damage plaster and grout, and irritate swimmers’ skin and eyes.
- High alkalinity (above 120 ppm): It makes pH stubbornly high, leading to cloudy water, calcium scaling on surfaces and pipes, clogged filters, and less effective chlorine.
Here’s a quick breakdown of how alkalinity levels can impact your pool:
| Alkalinity Level | pH Behavior | Equipment Impact | Water Quality |
|---|---|---|---|
| Low (<80 ppm) | Unstable, rapid swings | Corrosion of pumps, heaters; etching of plaster surfaces | Clear but corrosive water; skin and eye irritation |
| High (>120 ppm) | Locked at high levels | Calcium scaling; clogged pipes and filters | Cloudy water; reduced sanitizer effectiveness |
Up next, find out how to test your pool’s alkalinity accurately to keep these problems at bay.
How to Test Pool Alkalinity
Keeping your pool’s alkalinity balanced starts with regular testing. Aim for weekly maintenance and test once a week under normal conditions, but increase to 2–3 times per week during peak swimming season or after heavy use. Storms or adding chemicals also call for retesting [5]. Here’s how to test and interpret your pool’s alkalinity effectively.
Testing Tools and How They Work
There are three main ways to test alkalinity at home. Each method has its pros and cons, so choose one that fits your needs and budget:
- Test Strips: These are simple and affordable, costing about $20 for a basic kit. Dip the strip roughly 18 inches below the surface, wait 15–30 seconds, and match the color to the chart provided. While convenient, they might not be the most accurate option [1].
- Liquid Titration Kits: These kits offer more precision. Start by filling a test vial to the indicated level with pool water. If chlorine levels exceed 3.0 ppm, neutralize it first [2]. Add the alkalinity indicator and swirl the sample. Then, add the titration reagent drop by drop, counting each drop until the color changes – usually from green to red. Multiply the number of drops by 10 to get the alkalinity in ppm. Prices range from $20 for basic kits to $100 for professional-grade options.
- Digital Testers: For the most precise results, digital testers provide a clear numerical readout. However, they require regular calibration [4]. Alternatively, many pool supply stores offer free in-store testing services using advanced systems like AccuBlue®.
Before testing, run your pool pump for at least an hour to circulate the water. Collect your sample from 12–18 inches below the surface, away from jets or returns. Store your testing supplies in a cool, dry place out of direct sunlight, as reagents typically last about a year.
Understanding Your Test Results
Once you’ve tested your pool water, compare the results to the ideal range of 80–120 ppm [3]. If alkalinity falls below 80 ppm, you’ll need to raise it by adding sodium bicarbonate. If it exceeds 120 ppm, you’ll need to lower it using acid. Detailed instructions for these adjustments are provided in later sections.
Always balance alkalinity before addressing pH levels, as proper alkalinity helps stabilize pH. After making chemical adjustments, let the water circulate for 4–6 hours before retesting to ensure the changes are effective [3].
How to Raise Pool Alkalinity
If your pool’s total alkalinity drops below 80 ppm, the solution is simple: add sodium bicarbonate, commonly known as baking soda. This chemical is a go-to for pool owners because it boosts alkalinity without causing a significant spike in pH levels, making it a reliable and effective choice [6][7].
Adding Sodium Bicarbonate
Start by calculating how much sodium bicarbonate your pool needs. The general guideline is 1.4 to 1.5 pounds per 10,000 gallons of water to raise alkalinity by 10 ppm [6][7]. For example, if you have a 20,000-gallon pool and need to increase alkalinity by 20 ppm, you’ll need about 5.6 pounds of sodium bicarbonate.
| Desired Increase | 10,000 Gallons | 20,000 Gallons | 50,000 Gallons |
|---|---|---|---|
| 10 ppm | 1.4 lbs | 2.8 lbs | 7.0 lbs |
| 20 ppm | 2.8 lbs | 5.6 lbs | 14.0 lbs |
| 30 ppm | 4.2 lbs | 8.4 lbs | 21.0 lbs |
| 40 ppm | 5.6 lbs | 11.2 lbs | 28.0 lbs |
| 50 ppm | 7.0 lbs | 14.0 lbs | 35.0 lbs |
Important Notes:
- Never add more than 10 pounds of sodium bicarbonate per 10,000 gallons at a time.
- Avoid increasing alkalinity by more than 50 ppm in one treatment. For larger adjustments, divide the process into multiple applications over a few days.
To avoid issues like cloudiness or chemical settling, pre-dissolve the sodium bicarbonate in a 5-gallon bucket of water before adding it to the pool [7][8]. Slowly walk around the pool’s perimeter while pouring the solution to ensure even distribution [8]. Alternatively, you can sprinkle the powder directly over the water in a circular motion, then brush the pool floor immediately to prevent staining [1][7].
If your pool’s alkalinity is extremely low (50 ppm or below), test for metals in the water before adding chemicals to avoid staining [6][7]. Also, never pour sodium bicarbonate directly into the skimmer, as it could react dangerously with chemical feeders or chlorinators [10][11].
Once the chemical is added, allow the pool’s circulation system to distribute it evenly before testing again.
When to Re-Test After Adjustments
After adding sodium bicarbonate, run the pool pump continuously to help circulate and dissolve the chemical. Allow at least six hours for it to fully disperse throughout the system [9].
Wait between 6 and 24 hours before retesting your pool’s alkalinity to ensure accurate readings [9][1]. When retesting, also check the pH level, as sodium bicarbonate can cause a slight increase in pH [1][6]. If your alkalinity is within the ideal range of 80–120 ppm but the pH still needs adjustment, handle that separately.
How to Lower Pool Alkalinity
If your pool’s total alkalinity climbs above 120 ppm, it’s time to bring it down using acid. The two primary options are muriatic acid (liquid hydrochloric acid) and dry acid (sodium bisulfate). Both work well to reduce alkalinity, but they differ in cost and handling requirements.
When you adjust alkalinity, the pool’s pH will also drop. Once alkalinity reaches the desired range, you can restore the pH to 7.2–7.8 through aeration. This involves methods like running fountains, waterfalls, or aiming return jets upward to naturally release carbon dioxide. Below, we’ll cover the steps for safely applying acid to manage high alkalinity.
Using Acid to Lower Alkalinity
Muriatic acid offers a budget-friendly and fast-acting solution. For example:
- In a 10,000-gallon pool, about 25.6 ounces of full-strength muriatic acid will reduce alkalinity by 10 ppm [12].
- For a 20,000-gallon pool, adding 2 quarts of acid can lower alkalinity by approximately 12.5 ppm [13].
Dry acid (sodium bisulfate) is easier to handle because it doesn’t emit strong fumes, but it’s pricier and dissolves slower. Typically, you’ll need 1 pound per 10,000 gallons, though the exact amount depends on the product’s formulation [14].
To apply either acid safely:
- Dilute the acid in a plastic, acid-resistant bucket using a 10:1 water-to-acid ratio.
- Slowly pour the mixture into the pool’s deepest section, steering clear of metal fittings, lights, and skimmers.
- If using dry acid, ensure the granules are fully dissolved in water before adding them to avoid damaging the pool floor.
Once the acid is added, run the pool pump for 2 to 5 hours to circulate the chemical evenly. Wait at least 1 hour before allowing swimmers to re-enter the pool.
Safety Precautions When Using Acid
Acid is highly corrosive, so proper safety measures are essential. Always wear acid-resistant gloves, safety goggles or a face shield, a respirator, and long-sleeved clothing.
"Muriatic acid is extremely caustic. It can burn your skin in seconds, and the vapor from acid can cause serious respiratory problems without the proper protection. Always add acid to water, never the other way around, to avoid dangerous splattering."
- Matt, Founder, Swim University
Keep a hose nearby for immediate rinsing in case of skin contact, and store baking soda for neutralizing accidental spills. Always keep acid in its original container, stored in a cool, dry, and well-ventilated space away from other pool chemicals – especially chlorine – to avoid toxic gas formation. Never pour acid directly into the skimmer, as concentrated acid can harm your pump and filtration system.
Maintaining Alkalinity Over Time
Keeping your pool’s alkalinity stable is not a one-and-done task – it requires pool cleaning service and consistent care. Factors like rainfall, frequent use, and certain chemical treatments can disrupt the balance. For instance, acidic sanitizers and pH reducers tend to lower alkalinity over time, while heavy shock treatments might cause it to rise. Even the water you use to refill your pool can vary in alkalinity depending on your local water supply. This ongoing maintenance ties directly into the chemical management practices mentioned earlier.
Regular Testing and Adjustments
Frequent testing is essential, especially after events like rainstorms or heavy pool usage. Always adjust total alkalinity first before tackling pH levels. Since alkalinity acts as a stabilizing buffer, correcting it often naturally brings the pH into the ideal range, saving you extra steps.
Tracking Your Pool’s Chemical History
In addition to regular testing, maintaining a chemical log can make a big difference in long-term stability. Record details like test results, the date, chemical amounts added, and any relevant factors such as weather or pool usage. Over time, this log helps you identify patterns – like recurring drops in alkalinity after rain – allowing you to address issues early and streamline your pool care routine.
Conclusion
To keep your pool in great shape, aim to test your water weekly and maintain alkalinity levels between 80 and 120 ppm. This range helps protect your pool’s surfaces and equipment while creating a comfortable swimming environment. Keep in mind that factors like rainfall, heavy pool use, or changes in your water source can impact these levels, so regular testing is key.
When making adjustments, always tackle alkalinity first since it stabilizes pH levels. To raise alkalinity, use sodium bicarbonate – about 1.5 pounds per 10,000 gallons will increase it by 10 ppm. To lower it, carefully add muriatic acid or sodium bisulfate, and always wear protective gear like acid-resistant gloves, safety goggles, and long sleeves for safety.
After making any adjustments, let the water circulate before retesting. Proper alkalinity not only keeps the water crystal clear but also prevents corrosion, scaling, and surface damage, while ensuring swimmers enjoy an irritation-free experience.
If maintaining your pool chemistry feels overwhelming, reach out to Alligator Pools, Miami-Dade County’s trusted pool maintenance experts. With consistent monitoring and a few adjustments, your pool will stay clean, safe, and ready for swimming all season long.
FAQs
How does alkalinity impact pool pH levels?
Alkalinity is essential for keeping your pool’s pH levels steady. Think of it as a buffer that prevents sudden shifts in pH. If alkalinity is too high, the pH can climb, making it tough to manage and throwing off your water’s chemistry. On the flip side, low alkalinity can lead to quick pH swings, which might damage your pool and cause discomfort for swimmers.
To maintain a safe and pleasant swimming experience, it’s crucial to test and adjust your pool’s alkalinity regularly. Aim to keep it within the recommended range of 80–120 ppm. This balance not only protects your pool’s surfaces and equipment but also ensures better water quality.
What happens if pool alkalinity is not properly maintained?
Failing to keep your pool’s alkalinity in check can lead to a host of problems. When alkalinity levels are too high, you might notice scaling on pool surfaces and equipment, cloudy water, and a drop in the effectiveness of sanitizers like chlorine. On the flip side, low alkalinity can make the water corrosive, which can harm pool surfaces and equipment over time.
Beyond the damage to your pool, imbalanced alkalinity can also cause skin and eye irritation for swimmers, making the pool less enjoyable. Regularly testing and adjusting alkalinity is key to protecting your pool and ensuring a comfortable, safe swimming experience.
How often should I check my pool’s alkalinity levels?
You should check your pool’s alkalinity once a week to keep the water chemistry in check. Regular testing helps avoid issues like pH imbalances that can cause equipment damage, cloudy water, or even skin irritation.
For accurate results, stick to a dependable pool test kit or test strips. Adjust the alkalinity as needed to stay within the recommended range of 80-120 ppm. Consistent testing means safer, clearer water and a better swimming experience for everyone.