If your pool’s water flow feels sluggish, it’s likely due to one of five common issues: clogged baskets, dirty filters, air leaks, blocked impellers, or line obstructions. These problems can cause weak jets, poor suction, and stagnant water, especially in Miami’s debris-heavy, humid climate. Ignoring them can lead to costly equipment damage, like overheating pumps or cracked impellers.
Quick Fixes You Can Try in 5 Minutes:
- Clean skimmer and pump baskets: Remove debris and check for cracks.
- Read the filter pressure gauge: High PSI? Clean the filter. Low PSI? Look for air leaks or pump issues.
- Listen for pump noises: Unusual sounds may signal air leaks or mechanical problems.
- Inspect valves and returns: Ensure valves are open and jets aren’t blocked.
- Check skimmer and drain lines: Clear clogs with a drum auger if needed.
If these steps don’t solve the problem, it may be time to call a professional. Miami’s tropical environment can accelerate algae growth, scale buildup, and debris accumulation, making regular maintenance essential to keep your pool running smoothly.
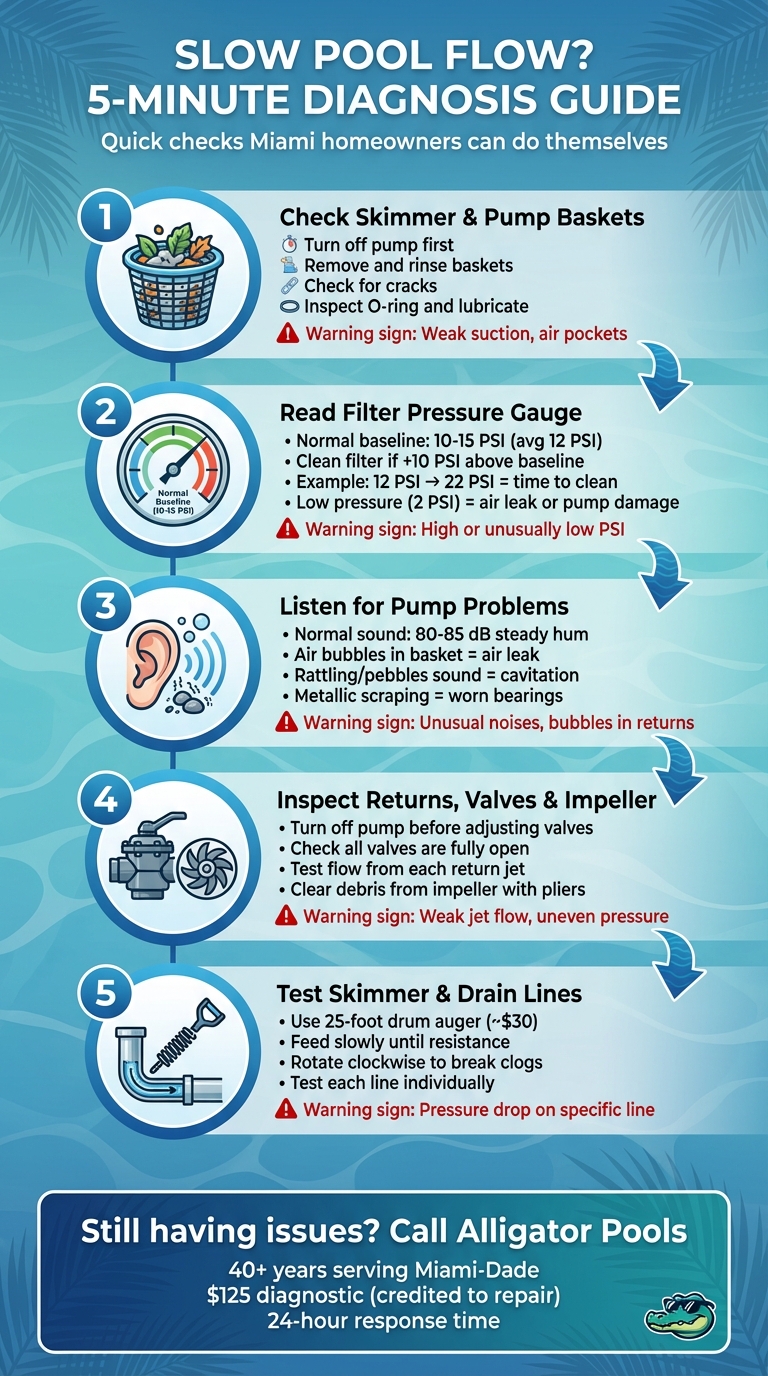
5-Step Pool Flow Diagnosis Guide for Miami Homeowners
POOL WATER Not Circulating? How to Fix Low Flow in Your Pump, Filter, and Jets
Step 1: Check Your Skimmer and Pump Baskets
Skimmer and pump baskets play a key role in protecting your filter by catching debris before it clogs the system. When these baskets become blocked, water flow is restricted, leading to weak suction at the skimmer, reduced return jet flow, and even air pockets in the pump basket that prevent it from filling properly [3][6].
Why Miami Pools Gather More Debris
Miami’s tropical climate and lush greenery mean pools in the area collect more debris than usual. Palm trees, flowering plants, and nearby landscaping regularly drop leaves, seeds, and organic matter into pools. Coastal breezes also carry fine beach sand, which adds to the filtering workload [5]. For instance, in December 2011, a Miami Beach pool owner found their pump impeller clogged with tiny seeds from nearby plants, causing major flow issues [3]. Similarly, a Naples resident reported their filter clogging within just "a few hours of use" after cleaning, showing how quickly debris builds up in South Florida [3]. This makes routine cleaning of skimmer and pump baskets a must.
Steps to Clean Skimmer and Pump Baskets
Start by turning off your pump. If your system is below water level, close the valves before the pump and set the multiport valve to "closed." Remove the skimmer lid and basket, then unscrew the pump lid to access its basket [2].
Dump out all debris and rinse the baskets thoroughly with a hose [6]. Check for cracks in the baskets – damaged ones can let debris bypass the filter [2]. Inspect the pump lid’s O-ring and apply a silicone or Teflon lubricant to ensure a tight seal, which helps prevent air leaks [7]. Once cleaned, put the baskets back, secure the pump lid, and restart your system. If the pump is dry, prime it by adding water before switching it on [2].
Step 2: Read Your Filter Pressure Gauge
The filter pressure gauge is your go-to tool for monitoring system pressure, measured in PSI. A rising PSI reading often means clogs are restricting water flow. To identify potential issues, compare your current gauge reading to your baseline.
What a Normal Filter Reading Looks Like
Every pool system is different, so it’s important to establish a baseline after thoroughly cleaning your system. Once you’ve cleaned your filter, pump basket, and skimmer baskets, run the system and take note of the PSI reading – this is your "clean reading" [6]. For many pools in Miami, a clean reading typically falls between 10–15 PSI, with 12 PSI being a common average. If the pressure increases by about 10 PSI above your baseline, it’s time to clean the filter. For instance, if your clean reading is 12 PSI and it rises to 22 PSI or higher, your filter is likely clogged. On the other hand, unusually low pressure – sometimes as low as 2 PSI – could indicate pump damage or air leaks [1].
How Miami’s Water Impacts Your Filter
Miami’s tropical environment accelerates algae growth and the breakdown of organic matter, which increases chemical usage and can clog filters more quickly [4]. For example, in December 2011, a Naples pool owner noticed their filter pressure spike from 8 PSI after cleaning to 20 PSI within just a few hours – even though the filter appeared clean [3]. During Miami’s peak debris season, regularly checking your pressure gauge and maintaining proper water chemistry can prevent scale buildup and help your pool system run smoothly [1].
Step 3: Listen for Pump Problems and Air Leaks
In addition to keeping an eye on your pump, your ears can provide valuable insights into potential pool flow problems. A healthy pump operates with a steady hum, usually around 80–85 dB [13][14]. Any sudden or unusual noises could point to issues with the pump or plumbing. By listening carefully, you can often catch problems early. Once you’ve tuned in to your pump, shift your attention to air leaks, as these can often explain strange pump sounds.
How to Spot Air Leaks
Air leaks typically occur on the suction side of your plumbing – before water reaches the pump impeller [9][11][12]. The most obvious indicator? Air bubbles in the pump’s strainer basket or bubbles flowing out of the return jets into the pool [9][12]. Start by checking the water level in your pool. It should be at least halfway up the skimmer intake; otherwise, the skimmer may pull in air instead of water [9].
To pinpoint the exact location of an air leak, try using foam shaving cream. Smear it over suspected areas, such as the pump lid O-ring, unions, or drain plugs, while the pump is running. If you see dimples forming in the foam, you’ve found the leak [9][11]. Additionally, listen for a hissing sound near joints, which can also signal a leak [8]. Other signs of an air leak include difficulty priming, frequent loss of prime, or lower-than-normal filter pressure [9][11][12].
What Different Pump Noises Mean
Certain pump noises can tell you exactly what’s wrong. For example, cavitation creates a sound similar to pebbles rattling inside the pump [10]. This happens when there’s a sharp drop in pressure near the impeller, often caused by a clogged line or a closed valve. To confirm cavitation, close the outlet valve and run the pump at zero flow. If the noise lessens or stops, cavitation is likely the issue [15].
Other noises can hint at more serious mechanical problems. Rattling, banging, or knocking often signals internal damage [14]. A persistent metallic scraping sound points to worn-out bearings [15]. If you hear this, turn off the pump immediately to avoid further damage. While it’s normal for pumps to get louder with increased workload, any sudden spike in noise volume should be investigated [13][14].
sbb-itb-a36f8f1
Step 4: Check Returns, Valves, and the Impeller
Once you’ve listened to the pump for unusual sounds, the next step is to inspect the pool’s returns, valves, and impeller for any blockages that could be restricting water circulation. This hands-on process takes just a few minutes and can make a big difference.
How to Inspect Returns and Valves
Start by checking the water flow from each return jet. If one jet feels noticeably weaker than the others, there’s likely a problem – either a blockage in that line or a valve that’s not fully open [16]. Always turn off the pump before adjusting any valves [17]. Examine each valve to confirm that it’s fully open [1].
If you partially close a return valve and notice improved flow from other jets but not from one specific jet, it’s a strong indication of a blockage in that line [16]. Keep an eye out for a steady stream of air bubbles coming from the returns; this often points to a suction-side air leak somewhere before the pump [7][18]. To pinpoint leaks around return fittings, turn off the pump and use a syringe to inject food coloring near the fitting. If the dye is drawn into a crack or fitting, you’ve identified the problem area [18].
Once you’ve verified that the returns and valves are functioning correctly, it’s time to check the impeller for debris.
Clearing Debris from the Impeller
A clogged impeller is a common culprit behind pressure drops. It can become jammed with debris like pine needles, seeds, or small pebbles [19]. Always turn off the power at the circuit breaker before working on your pump – don’t rely solely on the timer [19][21].
Begin by removing the pump basket and using your fingers or a small wire to clear any debris from the pump inlet [19]. If the issue persists, you may need to disassemble the pump housing. To do this, remove the clamp band or bolts securing the seal plate to the volute, then pull the motor straight back and take off the diffuser to expose the impeller [19][20][21]. Use needle-nose pliers or a long screwdriver to carefully remove debris lodged between the impeller vanes. Once cleaned, manually spin the impeller to ensure it moves freely [21].
After reassembling the pump, prime it with water and restore power to check if the issue is resolved.
Step 5: Test Your Skimmer and Drain Lines
With the impeller cleared, it’s time to make sure your skimmer and drain lines are free of blockages. These lines are crucial for maintaining proper water flow, so any obstruction can cause major issues.
How to Check for Line Clogs
Before you start, unplug the pump and switch off the circuit breaker for safety. Take a look at the area between the basket holder and the skimmer wall – this is a common spot for debris to get trapped.
If you suspect a clog, a 25-foot drum auger (available for around $30 [22]) can be a handy tool. Slowly feed the auger into the skimmer line until you feel resistance. Once you hit the blockage, rotate the tool clockwise to break it up. Be extra cautious when working around tight bends – if the auger encounters strong resistance, stop to avoid damaging the tool or the line.
After clearing the clog, reassemble the skimmer and restore power. To pinpoint which line might still be blocked, run the pump and test each suction line one at a time. Close the valves on all other lines while testing each individually. Keep an eye on your filter’s pressure gauge – a noticeable drop in pressure when testing a specific line points to a blockage in that line. Just make sure never to close all intake valves simultaneously, as this can harm your pump.
Once the lines are clear, check that all connected components are working as they should.
Making Sure Your Pressure Gauge Works
Sometimes, the problem isn’t a blockage in the lines – it’s a faulty pressure gauge giving false readings. A working pressure gauge is essential for monitoring flow throughout your system. If the gauge needle stays stuck at zero or doesn’t move, try tapping it lightly to see if that resolves the issue. Then, turn off the pump and check if the needle resets to zero. A properly functioning gauge should always return to zero when the pump is off.
If the needle doesn’t reset or the readings seem inconsistent, the gauge may be defective. Look for visible damage like cracks, rust, or a warped dial. In such cases, replacing the gauge – typically costing less than $20 [23] – can save you from chasing non-existent problems.
When to Call Alligator Pools for Help

If you’ve tried a quick 5-minute check and your pool problems persist, it might be time to bring in the experts.
Signs You Need a Professional
Some pool issues go beyond DIY fixes. For instance, if your pool’s water flow is still sluggish after your initial inspection, it could point to more serious complications. Problems like grinding pump noises, overheating, leaks, or a motor that just won’t respond need professional attention. Other red flags include losing more than 3.5 inches of water per week, repeated pipe blockages, valves that won’t budge, or filters that won’t work properly. And let’s not forget repairs involving electrical components or structural cracks near the skimmers – those are jobs best left to the pros for safety reasons [4].
"The sooner, the better! Promptly addressing pool issues can prevent them from worsening and causing more extensive damage. By calling Alligator Pools at the first sign of trouble, you’ll save time, money, and ensure your Miami-Dade area pool remains in top condition."
- Alligator Pools [24]
When these warning signs crop up, acting quickly and reaching out to a trusted pool service can save you from bigger headaches.
Why Choose Alligator Pools
When a pool problem requires more than just basic troubleshooting, professional know-how is a must. Alligator Pools has been solving South Florida’s pool problems since 1985, bringing over 40 years of experience to the Miami-Dade area [24]. They offer a $125 diagnostic fee, which is credited toward the repair cost. If the repair is under $125, they’ll fix it on the spot at no extra charge. And if they find no issue at all, you won’t pay a dime [24].
Their certified technicians are ready to assist within 24 hours for issues like leak detection, pump repairs, or problems with filters and saltwater systems [24]. Using advanced tools, they can pinpoint problems that might escape a basic inspection, ensuring efficient and long-lasting solutions [24].
"Our certified technicians are highly trained and experienced, using the latest tools and techniques to diagnose and repair any pool issue quickly and effectively. We insist on using only the highest-quality parts and materials to ensure long-lasting results."
- Alligator Pools [24]
Conclusion: Keep Your Pool Flowing Smoothly
Fixing slow pool flow doesn’t have to be complicated. Spend just a few minutes checking your skimmer and pump baskets, reading the filter pressure gauge, listening for air leaks, inspecting valves and returns, and testing your lines. These simple steps can help you catch most flow issues early, especially in Miami’s challenging climate, where heat and humidity can take a toll on your pool equipment. A little effort now can save you from bigger headaches later.
However, if problems persist – like grinding noises, overheating, or ongoing leaks – it’s time to call in the experts. Ignoring slow flow can lead to dirty water, poor circulation, and even equipment damage. Routine maintenance, like clearing baskets, monitoring filter pressure, checking for leaks, and balancing water chemistry, goes a long way in keeping your pool in top shape. Alligator Pools’ certified technicians have the tools and expertise to quickly diagnose and fix pool flow problems.
Whether you’re handling basic tasks yourself or relying on professional help, staying on top of maintenance ensures your pool remains a source of relaxation, not stress. Keep these checks part of your routine, and your pool will be ready for year-round enjoyment. Protect your investment and keep your pool running smoothly with a proactive approach.
FAQs
How often should I clean my pool’s skimmer and pump baskets in Miami?
In Miami’s warm, humid weather, cleaning your pool’s skimmer and pump baskets once a week is a smart move. This routine keeps debris like leaves, bugs, and dirt from clogging the system, ensuring water flows smoothly.
If your pool is near trees or gets a lot of use, you might need to check the baskets more often. Staying on top of this task not only keeps your pool running efficiently but also helps your equipment last longer.
When should I call a professional to fix my pool’s slow water flow?
If your pool’s water flow continues to drag despite your best efforts, it might be time to bring in a professional. Watch for these telltale signs: cloudy or discolored water that won’t clear up, strong chemical smells or skin irritation, pumps that are noisy or not working properly, visible algae taking over, or unexpectedly high energy bills. Cracks, leaks, or any noticeable equipment damage are also clear indicators that expert assistance is needed to avoid bigger headaches down the line.
Catching these issues early can save you money, spare you frustration, and keep your pool a safe and enjoyable retreat all year long.
How can I check if my pool’s pressure gauge is working correctly?
To ensure your pool’s pressure gauge is working correctly, begin by examining it for any obvious signs of damage, like cracks or rust, which can interfere with its accuracy. Then, compare the gauge’s reading to the actual water flow. For instance, if the gauge indicates high pressure but the water flow seems unusually weak, it might be a sign that the gauge is malfunctioning or needs to be recalibrated.
If you suspect an issue, you may want to replace the gauge or consult a professional to confirm everything is functioning as it should. A well-maintained pressure gauge is essential for keeping your pool’s water flow consistent and preventing potential system problems.